Quantcast
Channel: Mr Collins Mathematics Blog
Viewing all 123 articles
Browse latest View live

Displays for Learning

$
0
0
This week I was lucky enough to be able to visit one of the other local secondary schools to my school and take part in a NQT training morning. Part of the morning involved us taking a 'learning walk' around the school. We were 'toured' round by one of the 6th formers and saw lots of great lessons taking place.
Prior to the 'learning walks' taking place we were asked to look out for: assessment; differentiation and 'displays for learning'. The latter was one I was quite interested in as I like to think I present my classroom in an engaging way to my students and often change my displays dependant on my students' work etc. The school had recently changed all of its displays too and so there were lots of brand new displays on show.

As I walked round I was trying to take in all the ideas that the teachers were using. There were rooms where they had a 'Twitter board', much like the one I have in my classroom. Some rooms used the magic whiteboards (www.magicwhiteboard.co.uk) that I use in my room. We saw classroom doors that had speech bubbles on them with quotes or questions for students to be thinking about (presumably whilst queueing for the class in the corridor. The most impressive displays I saw were in MFL and I asked our tour guide if I could take some photos and here they are...

 Being the massive geek that I am it is easy to see why I chose to take pictures of these particular displays...

Angry Birds!
 Space Invaders!
 Pacman!
Spiderman!


Clearly a lot of time and effort have gone into these displays and they have given me ideas for future displays I can create in my own classroom!

GCSE Revision...with Y9! (Relay)

$
0
0
Last month, during the Easter holidays, I saw a tweet from @Ms_Kmp with a link to an idea on her blog to make GCSE revision more fun.

See her blog post here. Check out the rest of her blog too for some great ideas.

Our Y9s are sitting a mock METHODS in Mathematics paper next week in preparation for setting them for Y10 and to give them an idea of what will be expected next year. All bar the top sets will be sitting the foundation paper. As I teach one of the top sets I decided to put @Ms_Kmp's idea into practice. Here's how I did it...

We gave out a topic list to all classes as to what was on the mock paper and therefore what they should be revising for the examination (just the non-calculator paper). I asked the class, after giving out the topic list, if there were any topics in particular that they saw on the list that they had little or no idea about and then highlighted these to focus on in this week and next's lessons prior to their examination. The topics that were identified here were predictably Venn Diagrams, Surds, Standard Form etc.

I decided, on seeing @Ms_Kmp's tweet, that I would, in the first instance, use her revision lesson to go over a past paper, focusing on all the topics the class should be able to do based on the topics learnt to date. This way I could then identify those topics they'd need some more support on.

So, I browsed the Edexcel emporium (www.edexcelmaths.com) for some past exam paper questions that were similar to those that they would be faced with in their mock paper. I then put all of these questions (15 in total) into one word document. At the same time, I picked out the answers to each of these questions from the official mark schemes and put these in a separate document. I then, with the help of my tutor group, cut up the past paper questions document into individual questions so that I had 15 piles of the 15 questions. These were then put at the front of the class on the 2 tables where I would sit my G&T students.

On the tables at the front of the class I also put 4 copies of the mark scheme document for the G&T students to use throughout the lesson. The 4 students I chose were those who have consistently performed well this year and will be aiming at the level 8s come the end of the year. These students, as suggested, are also on the school's G&T register for Mathematics. At the start of the lesson I briefed these students on their role and explained the terminology of the mark scheme and how they should 'mark' the rest of the class' work using the mark scheme. Whilst they were browsing through this and familiarising themselves I was setting the rest of the class up. I asked the class to get themselves into teams of 2 or 3 students. They then had to allocate roles within their groups. One person was to be the 'runner' - the person who would take their questions up to the markers and then get the next question. One person was to have the final say on the groups answer to the questions before the runner would take them to be marked and the final person/s would be working through the questions with the group and keeping an eye on the class spreadsheet.

The class spreadsheet was where I came in. As the groups were arranging themselves I set this up on the IWB and put the group's names into it. Then, throughout the lesson I updated this with the questions the class were getting correct/incorrect. This gave a clear indication to the class as to which group was on which question etc.

The activity started with each group being given the 1st question. Once they felt they knew the answer they would go to the markers. If they got it right they would be given the next question and the markers would hand me their answer to update the spreadsheet. If they got it wrong they would be told how many marks they got and then a 'dash' would be put at the top of their question to indicate that they'd already got it wrong once, if they got it wrong a second time it would be marked incorrect and given to me for updating the xls. They would then be given the next question.

The lesson worked extremely well with the whole class engaged and trying to beat the other groups in terms of the question they were on and the accuracy of their answers. My 'markers' were fantastic and they all were actively marking groups' work and suggesting where they had gone wrong in line with the mark scheme. I told them that they could offer advice as to what the groups had done wrong in order for them to adjust their answers and this was a really positive experience for them. They were, at first, concerned by the fact they would not actually be answering the questions themselves, but I allowed them to have a copy of the questions to try as they were doing the marking themselves and I told them that by looking at the mark scheme and marking their peers' work that they'd be doing more than it first may have appeared. I believe that by them seeing the mark scheme, and working with it, that it will enable them to see where they pick up all the marks and how the 'workings' are needed and just by what extent in terms of the marks awarded for them. In our next lesson I am going to get them to feedback to the rest of the class what they found by doing this role and what they learnt from it - hopefully here they will be able to give the rest of the class tips when doing their exam.

Here's how the front of the class looked - the markers' desk...

This was right at the end of the lesson (I almost forgot to take a photo) and so it looks a little bit chaotic! The questions are to the right of the picture on the end of the tables - groups were to take the next question along each time. You can see the mark schemes on the desks the markers were using.


Here's a selection of the marked questions that were handed to me...

Hopefully you'll be able to see the marking on these, the corrections some of the groups had to make and those that had a 'dash' put on their sheets to indicate an initially incorrect answer?


Below, you can see the spreadsheet at the end of the lesson. I have deleted the names to keep my guys anonymous. I used some conditional formatting to highlight all the correct answers (1) and the incorrect answers were left as normal (0). From this I can now see that I need to, next lesson, go over HCF and LCM and enlargements from a centre of enlargement. These will form the basis of the starter of my lesson and then I'll go onto covering Venn Diagrams with the class (based on feedback from the class on their topic trackers). Here's the spreadsheet...

As you can see, group 5 managed to answer all their questions correctly. Group 9 were unable to answer question 7 as there weren't any questions left - some groups needed a spare as they had scribbled all over theirs. I put the topics of each question on the xls too so the class could see what was coming up!


If you do use this idea it'd be great to here how and how the lesson went for your class. Oh, and remember to thank @Ms_Kmp for the idea and to visit her blog http://mathssandpit.co.uk/blog/.

Crazy Talk!

$
0
0
On Thursday 2nd May #ukedchat held its' second #TeachTweet - a take on the #TeachMeet phenomenon whereby Twitter users sign up to present a video of something they have used in their lessons etc. One thing that stood out for me in this session was 'Crazy Talk'. Software that allows you to take any image and make it come to life with your own audio.


'Crazy Talk' was mentioned in @SheliBB's presentation, which can be seen here http://www.screenr.com/GhQ7.

After seeing @SheliBB's presentation I looked up the software and have downloaded the latest edition (free). I believe I'm in some sort of 15-day trial at the moment, as to what happens after that I'll find out soon. I'm assuming there's a paid subscription to the software, but think there is a 'standard' free version too - as to what this allows you to do I'm not sure. So, as you can tell I'm very much in the early phases of messing about with this.

So, here's what I created...

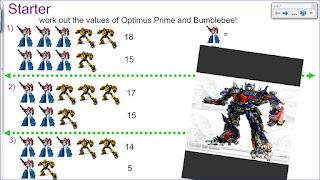
For my Y10 lesson on simultaneous equations I had previously used (last year) a starter involving finding values for optimus prime and bumblebee images. So, I thought, how about I get Optimus Prime himself to introduce the starter task to the class. I found an image off of Google Images and then followed the simple instructions on the 'Crazy Talk' software to record by own audio of Optimus and then downloaded it as a wmv file. I then wanted to import this into my SMART notebook slides. However, you can (to my knowledge) only import swf files. So i used Zamzar to convert the file, which then imported easily.

The 'Crazy Talk!' Optimus Prime video I created is below to see...


You can also see below a print screen of my starter slide with the video imported...


My Year 10 class had a mixture of responses to this...some of them thought it was hilarious, some of the 'too cool for school' kids thought it was a bit lame and then, when they realised it was my voice, they probably thought I was a bit 'lame' too! I did give out a 'you may find this amazing, you may think it's a bit ridiculous' message prior to showing it and I did have to use a bit of self-deprecating humour here! :) Nonetheless I think it went down well on the whole and would definitely work better with the lower year groups. It made the class smile and introduced the starter in a way that, in the future, could help me do certain 'admin' based tasks whilst the class are being introduced the task. For example, next time I create one of these (and there will be a next time) I will set it up so there is a delay in the message starting after I have started it so it can be 'live' on the IWB, moving etc, as the class enter and then I can hand out books, take the register etc as they are working on the starter task.

It'd be great to hear how others have used this in their class and to what effect. Let me know!

#TMSurrey

$
0
0
On Thursday 9th May I hosted #TMSurrey at Glyn School, Ewell, Surrey. It was a fantastic evening made possible by the people that attended and presented on the night. It was also only made possible due to the support I received from my school and through the advertisement of the event via Twitter etc.

 
This post aims to...share the organisational process of planning your own TeachMeet, share the presentations that were given on the night, and suggest ways in which the event may have been improved for future purposes.

Organising a TeachMeet was something I was hoping to do ever since I attended my first one at the Haywards Heath TM earlier in the year. It was something a few others at my school were keen to do/make happen too and so I started to plan the evening. Before I sent round an e-mail to the relevant people seeing if the TM could even go ahead, I did a bit of groundwork myself. I first looked at the school's calendar, the GCSE examination timetable, the meetings/INSET schedule etc to find a suitable day that was available and wouldn't coincide with anything else. I luckily managed to find 9th May as being free and so the date (at least in my head) was set. Next, I created a Google Doc to use for the signing up for the TeachMeet and advertising of all the information attendees/presenters would need. This document can be accessed here --> http://goo.gl/0YT6U. I also created a 'Logo' for the event (see above) so that when I would e-mail round to the heads of the school etc they would already see what I had been doing and would get an idea for what the event would start to look like and appear to others. I feel this part of the planning process was key, as without it, an e-mail merely asking if could run a TeachMeet on a given day would not have seemed as appealing, perhaps.

So, after I had created the documents and logo I began to think about what I would need from my school. Permission was the main thing - to give it the all needed 'go ahead', a venue was the next, closely followed by IT support and crucially attendees/presenters. So, I e-mailed round to the headteacher for their permission, the facilities manager to ensure I could book the school hall for that evening, the IT department to get the required tech set up in the hall on the day of the event and then the CPD manager for their support and guidance with the event.

I quickly received replies and my headteacher was more than happy for the event to take place. The facilities manager checked the diary and added the event to the list of scheduled events. The IT department confirmed that they could get the projectors/sound etc set up in the hall and the CPD manager arranged to meet so we could talk through the evening and what I'd need. So, with the all needed 'go ahead' from the school I started about getting the TeachMeet advertised via Twitter.

I first put the Logo, with a link to the sign up Google Doc, on the official TeachMeet website - http://teachmeet.pbworks.com/w/page/19975349/FrontPage and then started to tweet out the link to my Twitter followers. I made sure I tweeted this a few times and tried to plan this around the popular #ukedchat and #SLTchat. This way I was able to get a few RTs and more people were able to see the tweet and the event.
This all happened about 3 weeks before the event itself, which I think gave enough time for people to figure out if they'd be free, but not too far ahead that people'd ignore it initially and then forget about it!
In addition to tweeting out the details of the event, I advertised the event internally at my school via e-mail and our staff briefings. My Mathematics department were fantastic and all of them pretty much signed up straight away to attend and the majority of them were there on the night and some presented.
Soon, I had other people from the Twitter sphere signed up to present and attend. There was a great mix of people signed up and the presentations were nicely varied too.

The next thing to do was to try and get some 'sponsors' for the event that would provide some prizes for the raffle I had planned on the night. I was overwhelmed that of all the people I contacted, all of them kindly offered me a prize to give out on the night. The raffle was something that naturally drew a few other people to the event and the prizes on offer were amazing - ranging from books from Jim Smith and Caroline Bentley-Davies to products from the www.magicwhiteboard.co.uk and PTS Stickers http://www.primaryteaching.co.uk/. These prizes cost a lot of money and I am still extremely grateful to those that provided them. In addition Chris Green at Manga High was able to attend and present as well as provide a year's subscription to www.mangahigh.com - a website I have used since teaching Mathematics and one that I would recommend to any Mathematics teachers!

Whilst all the attendees/presenters were signing up and word was getting out about #TMSurrey through tweets etc I was busy filling in external booking forms for the school hall, meeting with our CPD manager to organise refreshments from our caterers (Cucina) and meeting with the IT technicians to arrange for additional projectors/laptops for the 'tweets' etc. All of these 'meetings' were important in getting everything I needed for the night and the evening wouldn't have gone ahead without their support.
Nearer the event, I had to get all the 'admin' type tasks done like getting a register for all external attendees (important for safeguarding and fire & safety regulations etc), getting prefects to help out on the night to show external attendees to the reception, showing them where to park etc, putting up signs around the school directing people to the school hall, and then putting together handouts for all attendees of the event.
Here's how the handouts looked...

Each person had one of these. They included a raffle ticket, a handout I created with details of the event and the Twitter handles for all the presenters, and the 10% off voucher from PTS Stickers - they made these flyers especially for #TMSurrey.


The week of the event was met with a few apologies of people being unable to attend and I was starting to worry that we'd not get enough people there in attendance. The good thing was that with those that were presenting that were unable to attend they still managed to take the time to record a video of their presentations that we could show on the night. I really liked this as it enabled some fantastic teachers to still share their ideas to those that attended. It also had a more #TeachTweet feel about it whereby Twitter users watch certain pre-recorded videos at certain times during the event 'as live'.
So, with a few people now not able to attend we ended up having around 25 people in attendance on the night - not as many as I had hoped, but if I learnt anything from the Hayward's Heath TM (where there were only about 10-12 of us) it was definitely more about quality and not quantity.

On the day of the event I got more and more anxious up until the 5:30pm starting time. I spent the time I could after school making sure everything was set up and ready to go. I still ran my Year 10 revision session from 3-4pm as this was still as important as ever for them. So, this left me with just over an hour before attendees started arriving.

Some presenters got there a bit earlier, which allowed me to ensure everything they needed for their presentations was unblocked by the school's WiFi and that I could access their presentation. I made sure all presentations were loaded and ready to go on the central computer linked to the main projector, we also had a separate outlet for those bringing personal laptops to connect to the main projector. We had some issues with getting the school's WiFi to allow Twitter and so had to use www.visibletweets.com to show the #TMSurrey tweets on the night. I made a 'random presentation generator' for the night which can easily be made using ppt - see here.

The night itself went really well and I honestly think all attendees enjoyed the evening and went away with more than a couple of ideas to use in their lessons/teaching. You can see all of the presentations (I still have copies of) by following the links in the Google Doc mentioned above, also here for your convenience. Just bear in mind that for some of them 'you had to be there'!


Improvements & suggestions for future TeachMeets I may organise...

The main improvement that I feel could have been made to the night was the advertising of the TeachMeet and getting the numbers of people through the door that I was hoping for.

I was slightly disappointed by the lack of people who attended from my school as other than the Mathematics department there were only about another 5-6 members of staff from my school. I feel I could have perhaps advertised it a bit better internally, maybe because I am a NQT and only started at the school in September I didn't have as much scope as others might have to get people to attend? Equally, the schools that we are linked to, our primaries and other local schools etc could have been contacted personally by me to advertise the event to them.

I think I relied too heavily on being able to get my Twitter followers (most of which probably do not live anywhere near Surrey) and staff from my school involved. If I learnt anything from the experience it is that there is a massive minority of teachers on Twitter. If you look at @ICTmagic's Twitter map, there are not many people on Twitter in the South-East region of the UK --> http://ictmagic.wikispaces.com/PLN+Map and so this already limits the number of people I was able to contact within the area I was targeting the TeachMeet. It then begs the question as to why more teachers aren't already getting involved with Twitter and the benefits it has on their teaching - perhaps they just have no idea as to how beneficial it actual can be? Perhaps it is a time constraint, an ICT constraint for some?
If/when I am to organise another TeachMeet in Surrey I will ensure I contact all local schools within the Surrey area, get them to advertise it to their staff and hopefully that way there will be more people there? Also, I don't think there are that many people, possibly linked to the fact that there a very few people 'on' Twitter, that actually know what a TeachMeet is or how to get involved in one - there are probably an equal amount of people that have never used a Google Doc?

This is something that perhaps we need to look at from a school's CPD point of view. Perhaps 'TeachMeet' type events should become the new model for a school's INSET session? To start with, just once a year (either at the start or end of the school year) to give staff a way of sharing their ideas and presenting to their school communities? Perhaps those people who have already organised and hosted TeachMeets could meet with school CPD managers to inform them of the process, the benefits of it and how to set one up at their schools?

All of these questions I'm not sure I have the answers to, or the capacity to do something about, but I will nonetheless continue to look at hosting another #TMSurrey next year, I will continue to tell my colleagues about Twitter, TeachMeets and all other manner of things I find out about via my PLN and will continue to share with others the ideas and strategies these sorts of events provide teachers with.

Together we are stronger!


Term 3 of my NQT year - an insight for future NQTs/ITTs

$
0
0
It seems like ages since I last had some time to sit down and write any sort of blog post. In fact, it's been since the start of May that I've had this luxury when I blogged about organising and hosting a TeachMeet at my current school. Since then, a whole host of things have taken place and needed doing that have taken priority over being able to take some time to write about all the things I have been using/doing in my classroom.

So, having finally found an hour or so to sit down and reflect on what has been an extremely busy 3rd (and final) term of my NQT year I thought it'd be good to give those that are about to start their initial teacher training or NQT year an insight into what they could experience towards the later end of their training years. Obviously nobody's experience will be the same as another's, and this year has been completely different to the end of my GTP year, but there are similar things that will crop up regardless of what school you train/work in.

The main difference in my NQT year from my GTP year has been the pressure of having a GCSE class to prepare for their examinations. Last year, I shared a bottom set Y11 group, all of whom got their C grades (bar 2 students), but this year I was solely responsible for a 2nd set Y10 class, a bottom set Y10 class  and a shared bottom set Y11 class. So, with this, came a lot of revision focused lessons, past paper practice, morning revision sessions, regular revision sessions after school and the general 'pressure' that surrounds you and your classes when trying to not only cover the content of the examinations, but also provide timely feedback so your students know where they are with the exam content and what they need to still work on.
The difference between the classes was massive in terms of their readiness for the examinations and my 2nd set Y10 class were fantastic in terms of the preparations they were making independent of our lessons. In the lead up to the examinations I had half the class (at least) stay behind after school once a week (at least) to go over past questions, topics they didn't understand and things they needed to clear up. I found that my class didn't seem to attend the department's revision sessions after school each week and so decided to set up a revision session after school specifically for them. I provided biscuits to entice the more reluctant students in the group to turn up and I was really pleased with the attendance at these sessions. I hope that the work and effort put in here will reflect in their grades come August when they open up their envelopes.
The other Y10 class were barely ready for the examinations and will do well to get a D grade on the examinations. However, some of them do stand a chance at this. They'll probably sit the same examinations in November or be put into a linear examination (currently they've been doing the Edexcel linked pair pilot [Methods] exams). This class have taken up a lot of time purely by having to constantly think of what I was going to try and teach them and what they'd actually respond well to. They were a difficult class to teach and took up a lot of time trying to differentiate activities accordingly and get the most out of them as possible.

Aside from the Y10 examinations, and preparation for these examinations, a lot of my time was spent sorting out my NQT year and all the elements of this. This included my NQT final assessment observation, the NQT moderation visit we had and the ongoing collection and notation of evidence for the standards. I had 3 (termly) assessments during my NQT year and the final assessment was to take place on a given day and I was told that my assessor would come in to any lesson on that day. Now, I was able to rule out 1 of the lessons as I knew they would be teaching at the same time (and cover was an issue that would not be added to), but the rest all had to be planned and prepared for in the same fashion I would normally, with an added element of 'Ooo...I'm being observed'!  On the day of the assessment I sent my assessor an e-mail to remind them of the lessons I would be teaching that day to which I had a reply that they'd be in to observe me P2 (Y7). So, this lesson I spent the entire time watching the class door awaiting their arrival...nothing happened! So, it got to P3 and still no sign, until halfway through the lesson my assessor turned up to observe the lesson. This, if anything, was better than if they had turned up P2 as the class I had P3, although it was one of my trickiest bottom set Y8 groups, were working fantastically well, were engaged throughout and was one of the most enjoyable lessons we'd had all year - I was a bit lucky in this respect! The lesson was graded 'outstanding' and that, apart from the official form filling etc, was that, for my NQT year.

The biggest time consumer outside of the classroom had to be the end of year reports and end of year assessments. Now, last year I had to do all these things, but as I had only 3-4 classes this didn't seem too much of a chore. I also didn't have a tutor group's reports to do as I shared a form with the Head of English and she was awesome in taking this responsibility. So this year came as a bit of a shock as I had 8 classes worth of reports to do...and my tutor group's comments.
Each of the reports took a good 3 and a half hours + to do if they were a class of 30 odd. My smaller classes (luckily I had a few of these) only took a couple of hours to do. The tutor comments for my form took up about 3 hours due to having to read through their comments from other subjects before writing my general comment about their report and also how they'd been in form time. In addition to the reports, there were also all the end of year assessments for my Y7-9 classes. These all took a while to mark and then plan effective feedback for, which therefore didn't leave much time for anything else.

In Term 3 there were then a lot of other more 'minor' things that took up time like:

organising Sports Day with the form group - this is a nightmare...avoiding clashes, making sure students weren't doing too many events, making sure all students were taking part, making sure the students knew what they were doing and at what times, getting students to do the least popular events etc

taking part in the fortnightly NQT sessions and those sessions provided externally that caused cover to be set up for the classes I'd miss on those days

for our Enrichment week (w/beg 15th Jul) I'm going to Spain with half of the Y8s and we had a meeting with parents to inform them about the trip and answer any questions

as part of our House duties we were asked to do the interviews for the new house captains after the Y11s left having completed their examinations

I was part of the teachers chosen in our department to run a Y6 --> Y7 induction session for 2 of the form groups entering the school in September

All of the above was in addition to the ongoing lesson planning, marking, assessments, meetings etc that you'd expect from any other teaching week.

Outside of school it's been a busy couple of months too, with the ongoing TES resource reviews, moving house and DJing at weddings and Leavers' Balls. All of this has had to squeeze into the weekly routines that I try to get in place and so it's no wonder that I've not been able to get on here and share my ideas etc.
However, there is now only 1 'teaching week' left at my current school, then it's our 'Enrichment Week' where I'm in Spain with Y8 and then...HELLO Summer!

It has definitely been a busy year, especially the final term of the year, and it has been as enjoyable as it has been hectic. Keeping on top of everything has been the main challenge, as well as trying to ensure that the quality of my lessons didn't suffer with the other duties/responsibilities needing fulfilling at the same time. The increase in the timetable time is the main thing to change in your NQt year and I'm assuming this will be one of the main differences next year when I'll have a 100% timetable as an NQT +1.

If I could say anything to myself prior to having started this year it would have been to do my reports as soon as they were available for writing. I managed to do this to a certain extent, but still found myself trying to get the tutor comments done with a day or so to spare. I'd also be a bit firmer at the start of the year with classes than I perhaps was this year. I don't think this had too much of a detrimental effect, but the classes could have been a bit sharper/tighter behaviour wise a bit sooner in the year. All of the experience I have gained from this year I will take to my 'new' school in September, which I am thoroughly looking forward to.

I'll be blogging about all of the lesson ideas/activities I have used over the past term in the next couple of weeks. So watch this space!

Musical Chairs

$
0
0
Throughout the year I have experimented with many different seating layouts in my classroom, which I revelled having this year. Each of the different layouts had their own purposes depending on what I was intending on doing with certain classes at certain stages throughout the year. I'm sure everyone has their own particular favourite seating layout. Personally, I still don't think I've found a 'perfect' arrangement. There are pros and cons to each, but I ideally think that your seating layout should fit the purpose of the lesson and in an ideal word we'd all have a set of magical Maths trolls that would come out between each lesson changeover and move the furniture accordingly.

Now, for many teachers I'm sure space in their classroom is a major issue in terms of whether there is literally enough space to have the tables and chairs spread out in groups or in rows. One problem I may face next year, when moving back to the school I was a cover supervisor at (very excited by the way), is that my room isn't as big as the one I've enjoyed this year and has a weird 'side room' within the room. There's currently a load of filing cabinets in this space, but I'm hoping to clear this area for some sort of 'TA table' where my LSAs/TAs can work with small groups as directed/discussed.

I'm sure I'll find a way of rearranging the furniture such as I have this year, but for now let's see the different layouts I've used this year. You'll probably see gradual changes in my room displays too, throughout the pictures. I tried to change things and mix things up as much as I could this year. Mainly due to wanting to keep my students on their toes, give them a stimulating environment to work in and ensure they had that wonderment of what was going to happen in their Mathematics lesson that day; what the room would look like, would they be doing group work etc etc.

Start of the Year:

 
To start the year off I kept it simple...rows! I kept a walk through in between the desks for me to easily move up and down the classroom. On the odd occasion I'd use the back of the classroom (quite a big area) to teach here too, or use the back wall display to refer to something another class had produced (or remind a class of what they had done previously).
 
The advantage of the rows at the start of the year was that it enabled me to set out my stall. Rows are great for maintaining discipline and setting out the boundaries. All students are facing the front and so have no excuses for not looking towards the front when expected. It is easy to see those that have turned round to chat to those behind them. I found that it was also good when seating my SEN students at the start of the year and getting to know how much/little support they would need early on. These students were either sat on the front row or on the ends of the rows, easily accessible via the gap going down the middle.
 
The negatives of this layout are that I found certain students, depending on where they were sat, did not get as much of my attention as perhaps other students did that were easier to get to. The students that are sat on the ends of the rows nearest the walls/windows, especially in the middle of the classroom where those that were just physically hard to get to without having to squeeze past chairs. A major downfall for me was also that, as many of my classes were lower sets they only contained a maximum of 12 students. These students found it hard to concentrate and would need sitting with and extra support to understand their work. The rows made it hard for my LSAs and I to easily get round them all and sit next to them to support them if a row was 'full'.
So, I felt a change was needed.
 
Before the actual 'change' from rows I did experiment by moving the desks into other arrangements when I was doing group based tasks that I didn't think rows really complimented. Here are a few, 'one off' arrangements that I did for those lessons where I felt rows were not suitable...
 
 
What I would call the 'as exam-style as I can get' layout. This was used when I needed the classes to work in exam-style conditions. This mainly occurred when doing the termly assessments. However, this layout was also good for paired work, especially when the tasks were quite competitive between pairings.

 
'Circle Time'. I used this layout with my Year 7s a few times as I liked the way we could discuss certain things together. One particular lesson involved looking at sequences. Another, collecting like terms.
 
After the rows (with some dispersed 'one-off' layouts) I went to a 'spine' layout...
 
 
The 'spine' layout was possibly the least successful layout for me personally. Although, another teacher that used my room when I was free said that they really liked it and was a bit disappointed when I changed it.
Note to any NQT/ITT (or teacher for that matter) whose room gets used by other members of staff when you're not teaching in there...make sure you make those members of staff that teach in your room aware of any changes to the seating layout! Some members of staff will get a bit 'perturbed', shall we say, of constant unannounced changes, others will adopt an attitude of 'it's your room, do what you like with it'. Know your colleagues!
What I was hoping to do with this layout was to have a layout that allowed the ability to work in groups at the same time of everyone being able to face the front and still act as if they were in 'rows'. However, what I found was that there were far too many distractions for my larger classes. Not only could they see the person sat next to them, and the other pair that were linked to their table, but they were also able to see over to the other side of the room. This led to some silly behaviour at times with the more difficult students. There was a lesson where the poor student sat on the back right's bag ended up under the table at the front left in a game I'll call 'pass the parcel whilst Collins' back is turned'. My smaller classes (size wise, not height wise) did benefit from this layout however, as my LSAs and I were able to support students easier and were able to teach the students in smaller groups, which at this point in the year was becoming far more important as it became evident quite quickly that they, as a group, did not have the attention span nor concentration to be taught 'as a class'. Teaching in groups was how I found best to teach my lower sets - with the much needed support from my amazing LSAs (who I briefed at the start of each lesson/ beforehand if possible).
 
So, this 'half way house' just wasn't good enough and so having tried grouped seating when doing group work in the odd lesson here and there I decided to go the whole hog and change the seating layout to 'groups'...


The 'groups' consisted of 5 grouped desks, which each sat 6 students. There was then a single table for 2 students to sit on that I had at the back of the room. The difference this layout had on my set 5 classes was just what I needed. It allowed me to work with one table of 6, my LSA/s to work with the other table of 6 and then we'd swap over for me to check understanding of the other table/teach them whilst my LSAs went and supported the other table with the work they had just been taught. This worked well for these classes (of which there were 3). It may not seem like the most practical way of doing things, and yes it did mean a lot of repeating what I had said on a number of occasions. But, what it did do, is for me to easily see where everyone was with the work, move those students on faster that were capable to do so and give further support to those that were struggling. It meant I could sit students on either of the tables based on where they had got to in previous lessons and there was a good element of competition between the groups when the task allowed it.
The larger groups didn't lose out either. My classes where I had 32 students remained working well as they had done. From the dispersed group work lessons at the start of the year, and from the feedback my survey monkey survey provided me, my classes liked doing group work activities. My 'exam classes' were now sat based on their mock grades so I had students of similar ability working together, allowing me to differentiate class activities more easily. I even used the front table in my top set year 9 class as the table for my G&T students. They were all sat on this table, right under the class board, which allowed me to go through trickier problems/concepts as and when they finished the main class tasks. I did of course invite others that had finished elsewhere to join in the discussions as and when this happened, rather than singling out the front table as being the most able.
Luckily, the room space allowed there to be a lot of room still between desks and it was much easier to ensure I got round each student in the class, more so than I was able to do (subconsciously anyway) with the 'rows'.
 
Finally, towards the end of the year, I thought I'd go completely bonkers and combine the two main layouts ('groups' and 'rows')...
 
 
Now, I feel I need to give this a bit more of a go next year, as I see potential here. Half the class in 'rows' the other half in 'groups'. This allowed me to do the best of both worlds in terms of my set 5 classes could still work on 2 of the grouped tables, and we ignored the 'rows' half of the class, unless of course I needed to use this space for naughty students! The larger classes were slightly tweaked in terms of who worked best on groups and those students who perhaps worked better individually and preferred a bit more quiet to just get on with their work. Knowing my students helped a lot here.
As I've mentioned above, I think I may need to try this out this coming school year to really examine the benefits of it. Possibly at a time of year where the activities I'd be doing aren't so much 'end of term'.
 
A few things to note about changing the layout of your room:
 
Make sure their is a purpose for doing it, and not just because you got bored in a free period.
Be aware of any students with SEN (particularly ASD) as they will need to be given prior warning of the change and will need to know where 'their' seat is/will be.
You'll need to change your seating plans, this will take a bit of time to change if it's an electronic version, easier if you just take a photo and write over it.
Let other staff know if/when you're going to change it.
Don't change your expectations just because the seating changes. Reinforce your classroom rules in the first lesson of each new layout.
Where will you sit your most 'tricky' students? At one point in the year I thought it'd be a good idea to sit my 'trickiest' 2 students together, at the back of the class. My reasoning being that they'd distract less students all that way back their...WRONG! This didn't work, and neither did they!
Where are your LSA/TAs going to sit? Get their opinion on the new layout/s.
Tell the class why you've changed the layout and their seating positions - they'll feel as if they've been involved in the process rather than just told what to do with no explanation!
 
If anyone has a particular favourite layout that they've used, be it one I've used this year or one I'm yet to experiment with I'd love to hear about it. Comment below or tweet me @mrprcollins.
 

ifaketext.com

$
0
0
A couple of months ago I came across the following website... www.ifaketext.com. The site allows you to create your own text messages.

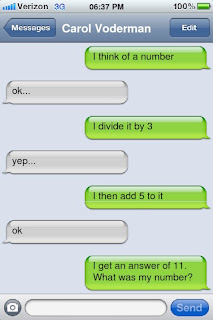
There are loads of ways you could use this site to create text messages that are then saved as images you can use in class. One way I have used the site so far is to create some 'I think of a number' conversations between my celebrity 'friends' and I!

Here's a few that I have made so far using the site...


 I used these images as a starter task for my students to answer whilst I was setting up the rest of the lesson and performing the admin type tasks needed.

My students soon pointed out that my network kept changing and so they couldn't be real! I apparently also got the conversation parts the wrong way round...easily fixed!

So, it wasn't long before my claim that these were texts sent from my actual friends was found out to be a lie.


I think these images are a great way to 'hook' students into a lesson. They look great, create a lot of intrigue and get them thinking/working straight away.

As suggested above I can see these being used in English loads when looking for dialect of two characters. Perhaps, taking a conversation from students' texts and putting them into text messages would help students identify with them better?

They can also be used to pose questions as a starter task. Maybe a plenary task in here too where they'd have to respond to questions asked in the message.

All of these can be set up and modified by you. You get to choose the name of the recipient/sender, your network (keep this the same otherwise you'll be found out too; if you're trying to convince a class they're real of course) and of course the content of the message/s.

There is also a www.ifakesiri.com

Bearings & Google Earth

$
0
0
In the 3rd term of this year I was due to teach Bearings to my set 5 year 8 classes. Now we had done a lot of work on drawing and measuring angles and so I wanted to try and find a way where they would be able to put into practice these skills whilst learning about bearings.

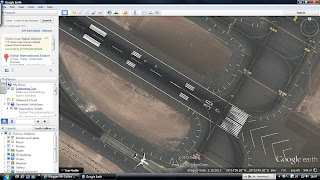
I started where I always do...the TES. I found on here a great lesson idea and set of resources by 'Webster75'. The resources involve looking at airport runways, the numbers on each of end of the runways and then creating your own airport with the correct numbers on the ends of the runways based on their bearings.

A link to the resource: http://www.tes.co.uk/teaching-resource/Runways-GCSE-Bearings-Lesson-6079340/

There is an in depth lesson plan as part of the resource that has a whole host of ideas to use. Some of these I did, others I chose not to based on my class' needs. However, I do like the idea of taking a class outside and doing the 1st activity using compasses.
I decided to use the powerpoint resources in the resource to introduce bearings to the class and how they relate to the numbers on the ends of the runways. Then, as suggested in the lesson plan, I decided to give my students a laptop 1 between 2 to use Google Earth to investigate the link between the numbers on the runways.
I was concerned as to whether Google Earth would work fast enough and well enough in class but these concerns soon disappeared when the students started to use the program. I asked them to look at Gatwick, Heathrow and then any other airport of their choice to start with. This led to a few conversations of places my students had been to or where their relatives where from (a great way to get to know your students a bit better).
I then got them to write down the numbers on each end of the runway, the actual bearing at either end and then once they had a few of these to try and find a link between them; I used the 'key questions' part of the lesson plan here.

I then drew out a similar diagram to one of the ones shown in the powerpoints to draw some of the bearings on. This helped to visualise the concept a bit clearer and some were able to see that the 'north' lines were parallel. This then led to me asking about what they knew about angles and parallel lines. Some students were able to point at those that were equal on my diagram, others were able to say which two angles added to 180 degrees. We soon drew out the link from these conversations and the students then used Google Earth to find another airport to check if their new 'rule' applied here too.

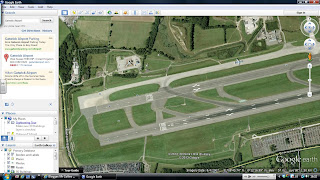
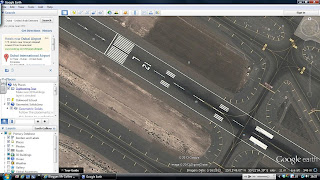
Some of the airport images...
If you don't have access to Google Earth you can get these images off of Google Maps, print them out and give them to students in pairs/groups and ask them to do the same as if they had the program to work with.

Gatwick Airport:

At the end of this runway you see the numbers 06, this means a bearing of 060 degrees


At the opposite end of the runway you see the numbers 26, meaning a bearing of 260 degrees.
Some students noticed a difference of 180 degrees between the bearings. When drawing the runway with the north lines and bearings at each end you are able to see the co-interior angles summing to 180 degrees.
 
Dubai:

12; bearing of 120 degrees. It's co-interior angle would then be 60 degrees (or a bearing of 060 in the case of the runway) so a bearing of 300 degrees would be at the other end of the runway, noted by the digits 30.


Be warned...after the kids have looked up what you ask them the first thing they'll do is search for their house, their friends house their uncle's house etc. Or...they'll try and get the flight simulator to work, or visit the moon, mars and space!
 
I recommend this resource to other mathematics teachers looking to teach Bearings at some point in the future. Be sure to take a look through the lesson plan as there are lots of ideas for tasks/activities you can do in and around using Google Earth as I did above.

Deal or No Deal Revision - refined

$
0
0
A couple of years a go I (with the help of Miss Moore) created my 'Deal or no Deal' boxes that I have used in class when exam season hits.
I first used the boxes back when I was a Cover Supervisor and volunteered to run a revision session in the Easter Holidays as part of the school's intervention programme for the GCSEs. You can see this on my old 'GTP reflective journal' blog at http://mrcollinsreflectivejournal.blogspot.co.uk/2011/08/revision-deal-or-no-deal-stylie.html

Now, I believe that I do revision lessons pretty well. I am able to find fun and engaging ways to do revision that my classes enjoy and learn from. One of these is my 'Deal or No Deal' revision session.


This year I decided to tweak the session from what I had done previously to make it even better than it had been. This was based on a conversation I had with my HoD about how it could be made better. We had run a joint revision lesson for our year 8 classes earlier in the year before their 'mid-term assessment' and we spoke about a few things that could be improved...

Before I had used SMARTboard and SMARTnotebook I was using a powerpoint file to have the 'Deal or No Deal' board on that I would update as the game was going on. This took time and stopped the session at points to do the all needed updating of the board. So, now that I had SMART to work with I created a board on SMARTnotebook that would allow me to easily swipe away the amounts. Not only this, I also put a question under each amount so that as it was swiped away a question would be revealed that the class would then all have a go at answering, rewards given to those with the correct answer. This made the game a bit more about revision than just opening boxes. Here's how the main 'board' looks like on screen...

 
Whilst the game is going on these questions aren't the only ones the students get to answer. In each player's box there is a question to answer once they (and their box) have been selected in the game. I also give each student a worksheet of 10-20 questions to be answering throughout and after the game has finished. This is how my most recent one looked...


These questions are then marked and gone through after the game has finished to check understanding and provide more of a particular question where necessary. The 'game' part of the lesson/session only takes up to 40 minutes to do. This leaves the rest of the session/lesson to go through the questions the students have to do throughout the game and those that are in their boxes. All the questions in the boxes are past exam questions too.
 
I feel the revision session using the above format not only engages my students, especially when they see the room set up in two aisles and with the red boxes on top, but it also gets them to answer more questions than they perhaps would if I had just given them a past paper and told them to get on with it. They discuss answers a lot more, work together to try and get the 250,000 prize box, which they are rewarded by accordingly throughout the continuous 'banker' offers - I always get a guest teacher to come and be the banker! I use my 'random box generator' to chose a box at the start of the lesson so all students have a fair chance of 'playing' the game. All other students are manning the boxes on their own or in pairs depending on numbers of students (I only have 20 boxes).
 

Balloons and #poundlandpedagogy

$
0
0
As part of my experimentation with #poundlandpedagogy I had bought some balloons to use in class. Now, last year, for one of my formally observed lessons on my GTP, I used balloons to hide 'clues' in for the project-based lesson we were doing. This year I decided to use the balloons to pose questions to the class to try and answer throughout their lesson.

On each of 7 or 8 balloons I wrote a question, the session below involved quadratic sequences, and in the balloon (prior to blowing them up) I placed the answer to the question on a piece of paper. The idea was, throughout the lesson, where we looked at quadratic sequences, if a student felt they could answer the question on any of the balloons they would let themselves be known and I would come and check their workings. If and when they did this they would then be allowed to come and pop (very carefully) the balloon they had answered with the magic balloon popperer (a compass). Out would fall the answer to that balloon's question and they would then win a prize (also got as part of #poundlandpedagogy).

Here are the balloons...


 It wasn't long on entering the class that my students immediately asked what the balloons were for.

The questions they had to answer were those that were only possible having learnt what they did in the main part of the lesson (unless, like one of my students, they clearly had some prior knowledge of quadratic sequences...he popped a few). This meant that the attention I got from the students was even greater than usual, with them all craving the knowledge to be able to answer the balloon questions and pop them to reveal if they were correct. I only checked their answers initially to ensure I didn't have 7-8 popped balloons with no correct answers.
It is definitely something that I will look to do again. It creates a great amount of intrigue, motivation and desire in the students. It also brings a great competitive element to the lesson to see who can be first to answer each question/pop a balloon.

I also used the string I bought as part of #poundlandpedagogy to hang them up next to the board!

Paper Plates and #poundlandpedagogy

$
0
0
Thinking of how I was going to teach my set 5 year 10 class provided something of an ongoing headache throughout the year. I was constantly having to ask myself what would get them involved in the lesson, what would actually benefit them - students who didn't see much 'point' in most of the things I was having to teach them in order for them to perform at all in their examinations. I tried all manner of ideas throughout the year.
These have included my mini Scheme of Work that I made and delivered for them. This worked for a while, but towards the 7th or 8th lessons in the Scheme of Work they started to lose interest in it. However, they did get a lot out of it and I will use this in the future. To see the Scheme of Work post click here...

http://mrcollinsmaths.blogspot.co.uk/2013/02/your-new-flat-scheme-of-work.html

I tried to make all of our lessons as interactive as possible with as many manipulatives that I could find appropriate for each lesson. I tried the 'text book' approach by just giving them a text book to work through on a topic after a brief instruction from me. Strangely 1 or 2 of them preferred these lessons over any other and liked being able to just get on with it. The rest ran out of concentration half-way through the lesson and the amount of questions attempted by some were embarrassing to say the least. So, having gone through this see-saw like attempt all year I decided to stick to what I felt they had worked best with when planning some revision lessons and that was with the more bizarre lessons, the lessons where that element of 'are we really doing this sir?' would crop up.

For one particular revision lesson I decided to use the paper plates I had bought as part of my experimentation with #poundlandpedagogy to revise everything we had done concerning circles. I also got out some straws to form the 'tangents' and gave them specific things to do with each paper plate they were given. The students were given a plate at a time and these were the things I asked them to do/draw on each plate...

1st I asked them to label all the key parts of a circle using the key vocab list I had put on the board. They had to write/draw/label each of the key words on their paper plate in the correct place. Here's what they created...


 As they were annotating their paper plates I was going round the class asking them why they were putting each word in each place - trying to get a definition out of them.


After they had finished this task I then got them to (roughly) draw any 3 or 4 lines from the centre of the circle (radii) and to then, as accurately as they could, with a protractor measure each angle of the sectors created. This led to discussions as to what the angles should sum to, how to use a protractor and the accuracies/inaccuracies of the lines they had drawn being the reasons behind why/why they didn't sum to 360 degrees...


After this task I then got students to measure the radius of a plate, it's diameter and then work out it's circumference and area using the formulae I reminded them of on the board and the approximation of Pi for those that didn't have a calculator with them (don't ask)!

At the end of the session we had a lot of plates annotated with circle vocab, angle facts, area and circumferences etc etc. Some students moved on to work out areas and lengths of sectors/arcs respectively. This then gave them all a clear visual aid to take home and hang up somewhere or add to their revision notes when revising for their examinations.


Probability Lesson & NQT Final Assessment

$
0
0
For my official, and final, NQT observation/assessment I was told that I would be observed on May 10th and that my NQT assessor could come into any of my 4 lessons I had on that day. This meant that I spent a fair amount of time the weekend before ensuring that my lessons were planned and I had all my resources ready to go regardless of what lesson my assessor would be popping in.

A quick tip for any NQT/PGCE/ITT starting in September...for any official observation make sure you give your assessor/observing everything they could possibly need for that lesson. This includes lesson plan, seating plan, class list, assessment results or scans of your mark book and copies of all the resources you'd be using that lessons. This way the see that you've clearly prepared for the lesson, have thought about what they need to see and they then should be able to see previous class results and link these to your lesson objectives and context for the lesson being observed. Also, have the class' books handy to show progression over time and marking - this all goes down well too!

On the day, I e-mailed my assessor just to say I looked forward to seeing them at some point that day (a gentle reminder). I then received a reply saying that the plan was for them to come and see me P2 (year 7). P2 came and went and I still hadn't seen my assessor. P3 was when they actually turned up and this lesson was with Year 8. A lesson on probability following their recent assessments. I don't know at this point if the statement of what lesson they'd be coming in was a 'test' of some sort, or whether it was just a matter of circumstance...I'm inclined to believe the latter.

Anyway, the lesson that was observed...I received an 'outstanding' grading for the lesson and so I thought it was worth sharing, and for my own personal teaching reflecting on and remembering for the future.

I knew the lesson I would be doing with this class (set 5 year 8) would be on probability following their recent assessment where the probability questions were not done particularly well - so I wanted to address this area of weakness. Now, even in my short time as a Mathematics teacher, I have used many different ideas/activities when teaching the topic of probability and its one of those topics that Mathematics teachers enjoy teaching in all manner of different ways. In the past I've done the Monty Hall problem, the horse race, watched Derren Brown's television shows, done a 'Maths Vegas' themed lesson and even observed other teachers using 'gambling' as a resource by 'betting' (fake 'money') on 'wacky races'. I decided to keep things a bit simpler this time round as I wanted my students to be comfortable with the vocabulary used in Probability and mainly, how to write a probability.

Here's my 5 Min Mathematics Lesson Plan for the observation (yes, this was perfectly acceptable for my final NQT lesson observation)...

This lesson plan was adapted by @ilovemathsgames from @TeacherToolkit's original 5 Min Lesson Plan. Both can be found on their respective Twitter pages/tweets and on the TES.

http://www.tes.co.uk/teaching-resource/The-5-Minute-Lesson-Plan-by-TeacherToolkit-6170564/


Before the lesson started I set out my classroom so that all of my 9 students (yes, I only had 9 students in my set 5 year 8 class) were sat around a single grouped set of tables. I then laid out the cheap paper tablecloths I got as part of my experimentation with #poundlandpedagogy. My aim with this was that the students would write on the table cloths throughout the lesson, rather than in their exercise books. The table (and cloth) were then added to with whiteboard pens and felt tip pens for the kids to use throughout the lesson.

The lesson started with an image of the answer/s to one page of their recent assessment (putting the lesson in context) with the particular question I wanted to address, the probability question, circled.


In addition to the image on the board I then started to introduce the lesson to the students as they got sat down. I showed them a bag, in which there were 11 multilink cubes of various colours and 1 'fruitella' sweet. I asked the students to write down any key words as they were said throughout the 1st task (and lesson on the whole). I then started to ask students to pick at random, from the bag a multilink cube. At this point they had no idea what was in the bag or what colours the cubes were, how many cubes there were etc. The point of this was to see if they could come up with an estimate for how many of each colour there were based on each students' picked item/cube. I went round the table after each student asking questions such as 'what do you think the chance/likelihood/probability is of that colour coming up?', 'is that colour more or less likely than another?', 'do you think the probability of that colour being picked is more than 1 in 2?' why? why not? etc.

After each student had had a go, and none of them had picked the sweet, I revealed to them all the contents of the bag. Throughout the task they had been writing down, on the table cloth/table the results of each student's picks. We then compared, after a brief moment of shock at the fact there was a sweet in the bag, the results with the actual items in the bag. Here I checked their understanding of how we express probabilities by asking what the probability was of each colour coming up. I then checked this further by going through 2 slides on my notebook file I created for the lesson...

 As you can see I checked here whether the class were able to express a probability as a fraction, revealing the convention when a few struggled. We also discussed here that probabilities of as single event occurring add to 1.
 To provide a link into the main activity I then did a similar thing with a dice rather than a bag of marbles to show that regardless of the event the conventions stay the same in terms of how we express probabilities. The dice on this slide is an interactive tool that when clicked 'rolls' the dice to generate a number - really useful. I got this off the TES somewhere but can't remember the particular resource. If it's yours let me know so I can link to it!

After this checking (mini plenary if you like) I set up the main activity by revealing the lesson objectives, showing what we had already covered and what we were going to look at next. I then explained the main task and gave out the dice and counters for the class to use. The main task consisted of each student individually rolling 2 dice. The numbers rolled on each dice would then determine which of 3 counters they would move up a space on the strips of paper they were given. If they rolled two even numbers one of the markers would move, two odd numbers a different counter and if one was odd and one was even they were to move the other (and final) counter. The winner was the one that got to the final 'square' on their strips. Here's the slide and image of the strips they were given to use...

The instructions, which some of the students found tricky to understand 1st time, were left on the board and reinforced to those that needed it. I worked with one student as I didn't have my LSA with me that lesson and they needed a bit of further support to get rolling!
There was an extension on the board too for those that finished quicker than others, which 2 or 3 of them got onto after being reminded what a square number was and what a prime number was. At this point I referred these students to the prime numbers display they had done earlier in the year (posters of the 1st 10 or so prime numbers).

This was the 'strip' of paper the students were given to place and move their markers up and down.

After the activity was done and each student had found a winner, which they wrote down on the table cloth, I went through our class results and then posed the question to the class 'why do you think this happened?'. I took a bunch of responses to the class and then drew up a sample space diagram to illustrate why it had happened.

We discussed the 'liklihood' of each counter being moved and then moved on.


The 2nd main activity involved rolling dice again. This time, I gave each student a sheet with numbers 1-36 written on them in a grid. I gave each student 10 markers to place on any of the numbered squares in the grid and told them not to show their partner. They could put more than 1 marker on a square, but no more than 3 on any one square. This was something that needed explaining a few times. I kept the instructions on the board too whilst the activity went on. I told the class that I would be rolling two dice and then multiplying the numbers that came up. If they had a marker on this number they would then take it off. The person with the most markers left on their sheets at the end would be the winner.

This is what their grids looked like. After the rules had been explained the students started to ask questions based on what they had just learnt about the dice and the probabilities of certain numbers coming up. We had a brief discussion of each question (without spoiling the outcome of the activity) before then starting to roll some numbers. At the end of the task I asked the students to now place their counters a 2nd time based on the squares they thought were best to put markers on (i.e. those that couldn't come up based on the rules of the game). This checked their understanding of the task and of the probability of certain numbers coming up, or not.

Finally, the plenary...

I really like these types of plenaries as they really do highlight who has grasped the lesson and who hasn't. They were each asked to write down, on the table cloth again, an outcome to which the answer was on the board. One by one I then went round the students asking for them to read out their outcome (a bit of literacy here) i.e. 'tomorrow will be a Saturday', 'the probability of rolling a 6 on a dice' and then asked another student to state what the probability was of that student's outcome using the probabilities and key words on the board. This was also differentiated by ability by the probabilities that were chosen. Most chose the worded probabilities like 'impossible' and 'evens', but there were a few at least that used the fractions to express their outcome (and correctly so).

Here's how the table looked at the end of the lesson...

As you can see, lots of key words written over the table. My explanation of '1 out of 12' and how this is written too with the 'out of' being the line between the numerator and denominator of a fraction...what is this line called? Is it called something? I think I have heard it referred as something other than a 'line' before? Answers on a postcard please (comment below).
The feedback I received from my assessor was really positive as my final assessment showed. His only 'concern' was the writing on the tables. One student had to write on the table as the cloth didn't stretch right the way over the grouped tables. I had written on the tables in the past with the class as it rubs off easily (I checked beforehand). My assessor's concern was that students, if allowed to draw on the tables in my lesson, could go to another classroom and do the same, assuming it was ok.
In an ideal world we'd all have whiteboard paint over our desks, on the walls etc to create a truly interactive environment. I have seen 'white rooms' before in libraries and universities where students can literally write on the walls, floor, ceiling, tables, chairs etc. All of which can be rubbed off and reused. Something for the future perhaps.


So, that's that. I got that 'buzz' throughout the lesson that tells me that everything is linking and going as I had envisaged; this doesn't always happen! The class were working fantastically throughout the lesson and were asking questions throughout. This was not the 'norm' with the class by any means and at times they had been difficult to teach/control. This lesson (and plenty of others) however, they were fantastic. I feel they got a lot from the lesson and just hope that they remember it for the future; retention is a key problem with the class.

I will use this 'format' of lesson in the future with small lower ability groups and may even use it with larger class sizes, students in groups with perhaps a different probability task to complete for each group. I may even do it with 'home' and 'expert' groups to get students moving round the room after each task to discuss their findings with other groups who hadn't seen/done certain tasks.

I hope my experience of my assessment will help others, and that ideas can be taken from the lesson I did with my year 8 class. It was one of the most enjoyable lessons I had with the class and one of the lessons that stands out from my NQT year (lucky timing on my behalf here).

How to Learn Math - Introduction (Session 1)

$
0
0
Having seen a few things floating around twitter and on the TES Mathematics community blog (http://community.tes.co.uk/tes_mathematics/b/weblog/default.aspx) I have enrolled today on Jo Boaler's 'How to Learn Math' course on Stanford University's free online platform.

All the course details are found on this site:

https://class.stanford.edu/courses/Education/EDUC115N/How_to_Learn_Math/about

Registration is really simple and you can start the course whenever you like and work through the 8 sessions at your own pace. It started on the 15th July and runs to the 27th Sep (2013). I've only just enrolled but haven't missed anything - all the course content for each session is ready to go once you've signed up.

Follow Jo Boaler on Twitter @joboaler and use the hashtag #HowToLearnMath to communicate with others on the course (there's over 25,000 people signed up to it).

I've just finished working my way through Session 1 (Introduction) and here are my thoughts so far...

The first session introduced the course and explored the problems with Mathematics teaching, perceptions about the subject and stereotypes behind the subject and its' learners. The main thing I have taken away from the session is just how much negativity there is towards our subject and how this can be combated by us teachers and the parents of our students too.
Throughout the session you are presented with a series of videos and complementing exercises to fill in/complete. These are fairly short exercises but can take longer depending on how much time you have to give to the course. I like the element of peer feedback where you are able to see others' responses and comment on them.
Personally it has made me think about how I teach Mathematics and what presumptions and generalisations I make about my students. It also made me question why so many students come into secondary school with a negative feeling towards Mathematics. Some students seem to have this perception that Mathematics is hard, they're not 'good at maths' and aren't as good as others. The session discussed the gender stereotypes in Mathematics and other cultural influences.

It got me thinking about how we 'label' some students in Mathematics, especially those 'bottom set' students who already find mathematics difficult but then get labelled as the 'bottom set' and this just helps to reinforce their beliefs. This, I feel, is one of the biggest problems with ability-setting students - the fact we attach some sort of label of ability to these students. I too am guilty of this as I can recall many times where I have, on my blog, referred to my 'bottom set' students as 'low ability'. Are they really? Perhaps, but surely by referring to them in this way I am putting a ceiling on what they are possibly capable of.
There have been lessons this year with these groups where a student may have said something negative to another student following a contribution of theirs to a class discussion. Something along the lines of 'that's wrong you idiot'. This then gets followed up by a comment from this student along the lines of 'well you're in the same set as me, you're just as stupid - we're all set 5!'

How we can move away from this 'label' the students seem to carry around with them is, I suppose, the 'big' question. One which I don't yet have an answer for, but am hoping to try and overcome with these classes.

The session also discussed intervention strategies that had been used to help overcome these stereotypes. These strategies are all psychological, which for me personally is great, what with my Psychology degree and background. The fact that girls can underperform on a test, that they have beforehand marked their gender, emphasises that there are elements of stereotyping that have been embedded in their beliefs and attitudes towards certain subjects.

Something that Craig Barton @mrbartonmaths and @tesMaths stated in his summary of session 1 is that we've all had parents at parents' evening excuse their child's perceived ability in Mathematics or progress in the subject due to them being 'poor' at maths themselves. I feel this is the starting point of students believing that they too can't be good at the subject, or that it is bound to be difficult. I don't think they'll be a student in my classes in September that doesn't have some sort of preconceived idea of their 'worth' in Mathematics. Past experiences will govern whether they are capable, or not, in Mathematics and they may have put them off altogether. Some may have high expectations on them due to always being in 'set 1' or because their parents were good at maths and so they should be too.

All of these questions/thoughts have been brought about by session 1 and the questions Jo poses in the video clips. There are loads of resources as part of the online platform too and I have the rest of Paul Lockhart's 'A Mathematician's Lament' to read (I've read the required first 5 pages) as part of the course reading.

I'm thoroughly looking forward to the rest of the sessions, which I will blog about as and when I complete each one.

I highly recommend this to any Mathematics teacher, teacher, parent or anyone that has some spare time over the Summer who has an interest in the above.

I have also just ordered Jo's book 'The Elephant in the Classroom' too to add to my Summer reading. Available from Amazon (other online book retailers are available of course) at: http://www.amazon.co.uk/The-Elephant-Classroom-Helping-Children/dp/0285638750/ref=sr_1_1?ie=UTF8&qid=1375188955&sr=8-1&keywords=the+elephant+in+the+classroom

How to Learn Math (Sessions 2 & 3)

$
0
0
For my blog post on session 1 of this free online course by @joboaler click here.

Session 2 of the 'How to Learn Math' course I'm currently working my way through was called 'Maths and Mindset' and spoke about how the brain can change and adapt and discussed the differences between a 'fixed' mindset and a 'growth' mindset.
This session was shorter than session 1 and introduced Carol Dweck's mindset research. The session asked a few short questions, the one that stuck out was one where I was asked to say how, if schools took mindset evidence seriously, would things change.
The main way I feel things would need to change is how we, as teachers, give students feedback and how what we say and how students interpret our messages affect their mathematics and attitudes towards maths.

Session 3 was called 'Mistakes and Persistence'. Having introduced the 'fixed' vs 'growth' mindset work in session 2, this session spoke about how students learn best from making mistakes. There was a really interested part about what happens in our brains when we make mistakes, in terms of the synapses etc.
What seemed to be evident from the two sessions is that people with a 'growth' mindset make more mistakes and learn from them. It didn't take long before I realised that this course will help me introduce a 'Fail Safe' culture in my room this year. Session 4, which I am looking forward to, is 'Teaching for a growth mindset'. This session, I hope, will give me strategies to use in class this year to help enforce a 'growth' mindset in my students, make them feel safe in the fact that they can make mistakes without feelings of 'i've failed' or 'i'm not good at maths'.
What also became evident in this session was the subtleties in the language you use in class and how this language affects your students. For example, rather than saying, 'no, that's wrong' saying 'not quite yet' implies that they will, at some point get to the correct answer and are on a 'learning journey' towards that end; making a few mistakes along the way and learning from them.
Another interesting point was that of the 'didactic contract'. The contract we enter into with students when asked for help. A student will put up their hand and ask a question and the teacher would go over, answer the question for the student, and then the student has the answer they sought, without any real thinking on their behalf. As much as I'd like to say that I, instead, encourage students to seek the answers themselves by asking other questions of them like 'what have you tried so far', 'what do you think you could do', 'if you tried 'x' and it didn't work, how about trying 'y'?' and so on. This is something that naturally, when you're a bit fed up, it's the end of the week (perhaps Friday P5) and the student in question is short on interest, becomes easier to give them the answer they seek in the hope that they then apply your thinking (from your explanation to them when telling them the answer) to the next question.
Finally, there was a discussion on speed in mathematics lessons and how this is one of the contributing factors to students experiencing anxiety in our subject and being afraid to make mistakes. This even included questioning timed examinations and whether the time it takes a person to complete a task is really important over them arriving at the answer/solution in their own time. The pressure time can put on students to complete tasks got me to think about the timings I give in class, the 1 min timed times tables task I have given my 'bottom set' students all year and whether this has had a detrimental effect on their progress/mindset.
However, we need to have some time constraints surely? So, I perhaps need to do a bit more thinking here. Project-based learning tasks clearly are open to the amount of time a student spends on them, but there needs to be a point where we say, 'OK, that's done now and lets move on'. I feel that in class, timed tasks can increase students motivation, especially if there is a competitive element to the task?
As the last task in session 3 we were asked to design a poster to state to students that they learn from their mistakes and that it was OK to make them. I've recently purchased the 'Fail Safe' posters from @SparkyTeaching (http://www.sparkyteaching.com/resources/creative/failsafe.php) as part of my want to create a more 'mistakes are ok' environment this year. I gave the link to these posters for this task as I think they're great.

In summary (and things for me to think about/do):
'growth' mindsets beat 'fixed' mindsets hands down
I've got to get students into this  'growth mindset'
mistakes are important and are huge learning opportunities
'didactic contract' - avoid it
speed (good or bad?) - 'faster isn't smarter'
think about the language used in class
effort is needed from the students to solve a problem that is challenging
set up more 'Spot the Mistake' plenaries
think about feedback given in books/verbally
'I love mistakes'
students write mistakes on board and discuss as a class

Right, off to do session 4...

How to Learn Math (Session 4)

$
0
0
To see my reflections on session 1, and sessions 2 and 3 click on the links below...

session 1 - http://goo.gl/zGhmxD
sessions 2 & 3 - http://goo.gl/2pjIQR

I was looking forward to session 4 ever since Jo Boaler (@joboaler) had started to refer to Carol Dweck's research in fixed and growth-mindsets. Session 4 was titled 'Teaching for a growth mindset'.
As the session title suggests it focused on how you can teach a growth mindset to your students. There was a really great video at the start of the session that got you to look at a teacher in the states introducing the question of what 1 divided by two thirds would be. The lesson was fantastic in showing an approach whereby the students are invited to show their thinking of a problem and trying to make sense of the problem. The 'how does it make sense' part was key to the lesson where the teacher asked her students to show why they thought their answer made sense, rather than showing a method, getting students to learn and copy that method and then apply it to some questions. What I thought was great in the lesson was how many different reasons were presented by the students and how some of these reasons would not have been discussed had the teacher just taught the method to dividing fractions.
In the lesson you had one student draw circles on the board, split them into thirds and then highlighting 2 of the thirds before exclaiming that you have 1 and a half of the two thirds. Another student used a rectangle, like a strip to show how this could be split into 3 equal parts and then used a similar explanation to show an answer of two thirds. There were one or two students who still couldn't grasp these explanations and persisted with an answer of 6 as they believed the 2 over 3 'line' meant that you multiplied the 2 and 3 together. This misconception was picked up by another student (not the teacher) and explained. The same student then randomly pulled out the number 12 when the teacher was putting the question into context of having a yard of wood (or something like that) and needing to take two third chunks from it. The student that mentioned 12 was asked what they meant to which they replied there were 12 feet in a yard. You could almost here the teacher's mind click before she said yes, and what is two thirds of 12? 8 and then you have 4 left over which is half of this, which makes 1 and a half.
These discussions wouldn't have been discussed had the students not been asked to 'make sense' of the problem, rather than just answering it.

Then, in the session, we were asked to look at a blog post from a teacher who had taken a rather closed question involving mini golf and transformed it into a really interesting and engaging open ended task. This was great to read and it is definitely a lesson I'll be using in the future when teaching similar triangles.
Check out www.fawnnguyen.com!

A few tips I picked up throughout the session were to 1) get students to 'convince themselves, convince a friend, convince a skeptic' and to 2) use a 'number sentence' when explaining their reasons to the class.

As has happened in previous sessions we were asked to do a few peer assessment questions which are read and commented on by other subscribers to the course. These questions/feedback have been really useful in seeing what ideas/opinions other teachers have and what things they are planning to do to get across growth-mindset messages to their classes.

The session also looked at what makes a growth-mindset problem and gave us 5 key things the growth mindset question should be (including having multiple entry points and being open). Jo discussed the problems with setting students in mathematics and what messages this gives them. She also discussed what good (growth-mindset) feedback should look like, why grades shouldn't be given based on research conducted and talked about our 'math brain'.

'Remember, the harder you work, the better you get at math'.

Check out www.map.mathshell.org too.

Go to http://class.stanford.edu to sign up for Jo Boaler's 'How to Learn Math'  now!

Picture Beads

$
0
0
Inspired by a question I was posed in Jo Boaler's (@joboaler) 'How to Learn Math' free online course [see http://class.stanford.edu] I have been getting creative with 'picture beads'!

Here's the question Jo posed...

This question has 2 parts, 1 open ended (growth-mindset) question and 1 closed (fixed-mindset) question.
The 'How do you see this shape growing' is of course the growth-mindset question as it is open ended, there are multiple answers, multiple entry points for students and there are different ways of looking at the problem (which I personally didn't see at first).

The 'How to Learn Math' course has made me more aware of the types of questions and tasks I give out in class and that I should be trying to make tasks as open ended as possible in order to instill a more growth-mindset in my students, allowing them to learn from their mistakes rather than just going through the methods learnt etc.

So, whilst I was in Ikea with @kutrahmoore (we were looking for a few bits for our new flat, exciting times!) she came across some beads that she apparently wanted to get elsewhere but were too expensive. I had no idea what they were or what she wanted them for but she said she'd explain when we got home.

Here's the pot (£5)...

When we got back...oh, I should probably say now that she's a Design & Technology teacher and so is a bit 'arty farty' having worked at a ceramics studios, studied at London College of Fashion (LCF) etc...she showed me how the beads worked by putting them on a 'peg board' in some sort of fashion, you then iron over the beads and it melts the plastic creating a picture of some sort that you can use for keyrings, place mats etc (I'm sure she'd come up with far more interesting ways of using these crafts).
So, it got me thinking of how I could use them. Immediately I thought about the beads and patterns they could form/make and so I started to play around with some of them on one of her peg boards.
Here's what I created...


 Here's my beads on the peg board arranged in a few patterns. My thinking is that I'd make a few of these and hand them out in class and pose students the same question as Jo did above...'How do you see this shape growing'. Then we'd go on to looking at working out specific pattern numbers, the 'nth' pattern etc. So, once you've created your pattern you then...
 ...put a piece of tracing paper (provided with the kit) over it and then carefully (otherwise the little buggers will move and you'll have to start over - this sucks) iron over it melting the plastic and making the beads 'stick' together. You have to iron them for about 3-4 mins and then...
 ...leave them to cool before peeling them off the peg board and the tracing paper.
 This is what they look like when they're finished, although Hannah (@kutrahmoore) said I should have ironed both sides. The side shown is the non-ironed side as I liked how the individual beads are easier to see here (and count). If I'd have ironed both sides you lose a bit of the definition between beads (as they all melt into one).
 Naturally, after I had made a few patterns for class I started to experiment...
 Then @kutrahmoore gave it a go too...
...and we created these little beauties! Great for a rainy day, or if you're a math teacher looking to introduce some open question on sequences/series/patterns etc.


We then got thinking and thought that these would be a great thing to do in a 'Creative Maths Club' that could be run after school for students to attend. They could take their created patterns home after, or even better, be used in other classes by other students - all created by the students. I've also thought about making some ratio bracelets too to use in class, all I'll need for this is some wire and to thread the beads onto these in different ratios!

Other ideas for a 'Creative Maths Club':

Origami numbers (I recently found an App on the iPhone that gives you instructions for making numbers from origami (folding paper)).
Angry Bird Nets
Polydron 3D shapes
Making Math board games
Darts! (there's a blog post coming soon about this)
+ plenty more

Get some 'picture beads', and the like, by going to Ikea http://www.ikea.com/gb/en/search/?query=pyssla or any other good arts and crafts store!

How to Learn Math (Session 5)

$
0
0
To see my previous posts, reflecting on sessions 1-4, click on the below links...

Session 1: http://goo.gl/zGhmxD
Session 2-3: http://goo.gl/2pjIQR
Session 4: http://goo.gl/w61q9o

Session 5 of How to Learn Math by @joboaler via Stanford University's online platform (class.stanford.edu) is called 'Conceptual Learning, Part 1: Number Sense'.

The session is possibly the most interesting yet due to the amount of classroom practice you get to see via the videos that are posted in the session. The session begins by calling on recent research to suggest that students' foundational knowledge of mathematics is what determines how successful they are in their future mathematics. Now, I've always been a believer that maths is like a set of building blocks and without the basics you don't get very far; you need a base level in order to build upon.
This is what this session was about. The session looked out how, at the basic level, students count, count on, have knowledge of number bonds or use 'number sense', the ability to break down and move around parts of numbers in order to make arithmetic easier. For example, when adding 7 and 18 you could add 18 and 2 to make 20 and then add on the remaining 5 (from the 7) to make 25. This was one of the examples I was given.

This was when the session got really great...

I was asked to then watch a few teachers going through some 'Number Talks' or 'Math Talks'. These classroom observations were fantastic in showing teachers' methods in finding out students ways of working out multiplications, additions and thinking of basic number questions. The clips showed a class of high school/undergrad students answering questions like 18 x 5, 12 x 15 and 25 x 29.
In each of the clips I was asked to note down what the teacher was doing and the 'teacher moves' they were using in the 'Number Talk'. These alone were really useful in thinking of ways to pull out answers from students, cover mistakes that crop up and get students to really think about how they're explaining their answers. I particularly found it interesting how one teacher used leading questions to drag out clarification from students as to what they were thinking. Lead ins like 'because...' and 'you knew that...' helped to get students to think of ways of explaining their previous thoughts.

What I also liked was that the teachers visualised the problems for students to give an added representation of the problems given. These were then linked to algebra and the distributive/associative laws.

A tip I picked up during the videos was that when a new idea or question was posed the teacher would get students to discuss with one another what they thought, rather than just waiting for someone to respond, as was stated - 'when ideas are complicated or new, sharing ideas can help u clarify our own thinking'.

The best thing about the 'Number Talks' is that it allows you and your peers to see the number of different ways of looking at a problem. It allows you to discuss common misconceptions and cover mistakes (learning from them in the process). For example with the first 18 x 5 question you could:

halve 18 to make 9, multiply this by 5 to give 45 and then double it to get 90
do 10 x 5 and 8 x 5 to get 50 and 40 and then add to give 90
do 20 x 5 to give 100 and then subtract 2 x 5 to give 90
you could visualise the problem in your head as being a multiplication problem set out in 'columns', going through what you carry over at each step and then coming to your answer
you could split the 18 into 6 and 3 and the 9 into 3 and 3 and then multiply these numbers together
you could draw a rectangle with length 18 and width 9, split it up as you feel best and work out individual areas before adding together
and so on and so on.
The beauty with this open approach to seeing the thinking involved is that you don't automatically see ALL possibilities, just the one that you perhaps prefer or know best. So, by getting all answers from a class you get to see other people's thinking and then can approach a new problem with an additional perspective.

I kept hearing phrases like 'number sentence' and 'friendly numbers'. These may be terms they use in the USA more often they we do in the UK, or perhaps they're used in the primary setting more than secondary but I can't say I've come across them myself, until now!
For clarity, a number sentence is a way of working out a problem, so for the problem where students were given a 'dot card' and asked how many dots were on it they were asked to say how they approached the problem. One student said they saw one row of 3, then a row of 2 and then another row of 3 and a final row of 2. Their number sentence would then be 3 + 2 + 3 + 2 = 10.
A 'friendly number' is a number that is 'nicer' to count with, like 10 and 5 and students try to break larger numbers down to these 'friendly numbers' to make the addition/multiplication/division etc easier to do. So for example 16-13 could be 10-10 and then 6-3 to give 3, rather than counting backwards, which requires a more difficult skill.

I continue to really enjoy the course:

it's making me think about the types of tasks I want to focus more heavily on this year
it's getting me to think about the language I use in class
it's getting me to think about the questions I pose in class
it's getting me to think about the messages my classroom can give students
and ultimately it's getting me to think more about how my students learn maths.

The videos are fantastic, the resources and references you can read through the online platform/download are great. I like the peer feedback facility and the short tasks that you are asked to do on there. If anyone hasn't started this already I suggest you sign up - there's plenty of time before the expiry of the course at the end of September.
I'm already getting intrigued about the student version of the course that will be coming out and whether this will be in the same format (online, free, through stanford.edu) and how best to get my students on board with it and signed up! Hopefully more details will come available in due course...?

180!

$
0
0
Back in June I came across the following resource on the TES...

http://www.tes.co.uk/teaching-resource/Darts-Project-number-and-geometry-project-6323154/

The resource is a Darts project that gets students to practise their use of compasses to construct their own dartboard. This, however, is only the 1st part of the resource. The second part includes a set of 8 'challenge cards' that get students to answer questions based on the possible scores you can throw in darts. The challenge cards are differentiated and levelled starting at asking what scores you would get if you threw, say, a single 8, double 7 and treble 6 up to the highest level challenge cards which ask students to work out how many ways they can achieve a certain score with 1, 2 or 3 darts. The higher challenges require a lot of thinking and workings, which makes these challenges great for seeing how students approach a task, whether they are able to work systematically and present their findings.

As part of the resource the uploader (chk242) has included a lesson plan, the powerpoint with the challenge cards on it, assessment sheets and a link to his blog post, which you can also view below...

http://mathematicalmagpie.blogspot.co.uk/2013/02/bullseye-mathematics-of-dartboard.html

Naturally, as soon as I saw the resource I had to go and get myself a dart board and get started with the 'project' straight away. I used the end of term lessons to trial out the project.

Here's the dart board I got...

I was originally looking for a magnetic one as suggested in the blog post above, but when I saw the selection on offer at Toys 'R' Us in Croydon and saw this one I decided to go with this - it has that 'ping' noise when the darts hit the board, and I like that!

It only cost £12.99


The board is a magnetic to the kids as soon as they see it. They want to know what it's for, whether they're going to play darts, if it's mine etc etc. It acts as a good visual aid for students when creating their dartboards using their compasses. The only downside to the one I have is that there is no bull/bull's eye, just the one 'bull'.

I found that it took most students a lesson and a half to complete their dartboards, after having introduced the project, used the mymaths lesson as the 'starter' activity and then set the class off on drawing their circles etc. It shows how weak some students can be with using a pair of compasses (and also that half the compasses I had to work with were far too loose to be used effectively). We were able to discuss how big each of the sectors had to be using angle facts we had learnt previously which was a nice 'stopping point' in the lesson when a few students had got to the point where they were ready to draw the sectors.
The challenge cards then took anything from a lesson and a half to 3 lessons depending on how much time you have to give to the project, and how long your students stay with it. Some of my students were really interested in finding all possible ways of making certain numbers using the darts and would happily have worked through each of the challenge cards if given the chance.

In addition to the challenge cards, and creating the dart boards I used my dartboard to have a class challenge to see who could get the highest '3 dart score', much like in the blog post above. This introduced a nice 'sideline' to the main tasks and my classes got quite competitive with this. I also used the board in a few of my 'last lessons' of the year to play other dart based games such as 501, 301 (when time permitted a shorter game) and 'Killer'.

I also found, that whilst the board was at the back of my room, I could use it to settle conflicts in the classroom or to use it as a reward for those that finished tasks. It's great for choosing a set number of questions students have to answer too, although this can go both ways depending on how good you are at darts/who you allow to through the 'dart of decisiveness'!

A lot of fun can be had with the 'project' and the dart board in general. I plan to have the board put up in my new classroom ready for next year (with the darts hidden out of sight until I need them).

The board was also used in my school's Open Evening. I had one of my top set year 9 students help me out with the board and we had a 'who could get the highest 3 dart score' competition on the night with (potential) students, their parents and their brothers/sisters all trying to get the highest score. The mental maths involved in adding their 3 darts was quite challenging for some of the younger students (and some of the parents too) and it created a great 'buzz' about the room we were in.

Thanks once again to chk242 for uploading this resource.

Scrabble Tiles: The Best Literacy/Numeracy Activity?

$
0
0
I often 'favourite' a lot of tweets I see on my Twitter feed and later revisit them. A lot of the tweets I favourite are just simply pictures to inspire me, have quotes on that I can use or can be put up on display in class. When looking back through my 'favourited' tweets recently I came across one that had tweeted the following picture...


There are plenty of these 'Scrabble' tiles images you can download and print out just by going to Google and doing a quick search.


I've just printed off about 8-9 of these on a full page of A4 so I have plenty to use in class. I've cut them all up, laminated them and they're now ready to use...

Here's how they look. I'm planning on using these in the following ways as short starter activities to do in class. My aim behind these activities is to give students a chance to get their brains thinking mathematically and to also introduce a bit of literacy into my lessons.

I imagine that, for English teachers, getting numeracy into lessons is just as tricky as it is for us Mathematics teachers to get in the literacy element. So hopefully with this task it covers both bases.

Here are the ideas...

For a starter task students would each be given 7-8 of the tiles each and they'd be asked to create a word that could either be linked to the lesson objectives or not. For other subjects that are trying to build in numeracy (Geography, History, Science etc) I feel you'd have to get students to try and link them to that subject. MFL could do the same here but with words in French, German, Spanish etc. For Mathematics however, they can just attempt any word they can think of from their tiles. Now, due to the numbers of each tile available some students may not get a suitable vowel or enough of certain letters, so I'd introduce an option here to work with partners or groups to 'swap' and share tiles as needed.
The idea would then be to try and come up with the highest scoring word possible. For weaker students this can be left by using the 'Scrabble' scores for each letter i.e. for the word 'algebra' they'd get 1 + 1 + 2 + 1 + 3 + 1 + 1 = 10. However to challenge students further...

You can get students to assign values to each letter of the Alphabet according to their position in the alphabet i.e. A = 1, B = 2, C = 3, ..., Z = 26. Then, having formed a suitably correct word, the student would multiply the 'Scrabble' tiles score with the letter's position in the alphabet. i.e. for the 'Scrabble' tile G, for which you get 2 points, and is placed 7th in the alphabet, you'd get a score of 2 x 7 = 14. All letter scores would then be added together to reveal the word's total score.

For example...

Using the word 'algebra'
A = 1 and is 1st letter of the alphabet, score of 1 x 1 = 1
L = 1 and is the 12th letter of the alphabet, score of 1 x 12 = 12
G = 2 and is the 7th letter of the alphabet, score of 2 x 7 = 14
E = 1 and is the 5th letter of the alphabet, score of 1 x 5 = 5
B = 3 and is the 2nd letter of the alphabet, score of 3 x 2 = 6
R = 1 and is the 18th letter of the alphabet, score of 1 x 18 = 18
and finally, A = 1 and is 1st letter of the alphabet, score of 1 x 1 = 1. So, that would give you 1 + 12 + 14 + 5 + 6 + 18 + 1 = 57. A total word score of 57.

Along the same rules you could ask students open questions like:

What is the best tile to choose?
Which is the best vowel to choose?
Would a 5-letter word always score more than a 3-letter word? Why? Why not?

Alternatively, you could get students to, on finding a suitable word, use BIDMAS (and the 'Scrabble' tile scores) to reach a desired number. For example, using the above word 'factor' and trying to reach the target number of, say, 24, you could do:

4 x (1 + 3 + 1 + 1 + 1) = 24

Again, you could ask here:

How many possible ways are there of making [24] with your word?
Which of the numbers between [1 and 10] can/can not be achieved with your word?
What's the highest number you can achieve with your word? How can you be sure?

If anybody has any other suggestions on how these could be used then please get in touch at @mrprcollins or by commenting below...I'm now going to check my SPAG!

My 'go to' websites and resources

$
0
0
In preparation for starting the new school year I've been busy going through my 'favourites' tab on my Internet Explorer browser. I thought this would be the ideal time (having deleted a lot of old sites and blogs that aren't regularly updated) to list them for future use over the course of the next school year. I figured this would be useful, not only to me, but to other teachers (and in particular Mathematics teachers) that are looking for a few reliable sources. So here they are...

Mathematics Websites/Blogs:

The TES Mathematics Resources page
http://www.tes.co.uk/maths-secondary-teaching-resources/

This is definitely my first port of call when I'm looking for new resources to teach a particular topic. Being on the TES Maths Panel has its advantages too in helping sift out the very best resources on the site. Check out the @tesMaths Twitter account for regular updates on 'resource of the day' and 'resource of the week'.

Don Steward's 'Median' blog
http://donsteward.blogspot.co.uk/

This blog is crammed full of brilliant tasks and images that can be easily printed off to use in class. It is by far the site/blog I wish I was the creator of, thank you Mr Steward!

Nrich
http://nrich.maths.org/6840

I love the Nrich posters (link above) and have many of these laminated and put on display in class for students to be inspired by and to do when they may have finished their task/s. The challenges, rich tasks and lesson ideas on the site are great.

Great Maths Teaching Ideas
http://www.greatmathsteachingideas.com/

This site, by William Emeny (@Maths_Master) is excellent when looking for...'great maths teaching ideas'. I particularly like his orange peel lesson to help show where the formula for the surface area of a sphere comes from. William regularly tweets out his ideas from the site so be sure to follow him (if you don't already - I'm sure there's 1 or 2 out there).

Ellie's 'Active Maths' blog
http://activemaths.edublogs.org/

This was one of the first blogs I came across when I first joined Twitter. I followed @PivotalEllie and soon signed up to her 'active maths' e-mails. Although the site appears to not have any recent blog posts the e-mail tips are still being sent out and I would recommend signing up to these by going to the 'Join Free Tips List' page using the above link.

Mr Taylor's 'To Infinity and Beyond' blog
http://taylorda01.blogspot.co.uk/

I follow Mr Taylor on Twitter (@taylorda01) and regularly read his blog posts. I find his reflections on his teaching and the regular posting of his own resources really useful. I particularly like the @mathschallenge tweets images that he has recently put together.

'I Speak Math' blog
http://ispeakmath.org/

The 'I Speak Math' blog is one that I have only recently stumbled upon and is by @jreulbach. It's a blog from the US for Middle School math teachers and each Sunday has a 'MS Sunday Funday' blog topic (much like the #blogsync) where math teachers all blog on a similar topic, which are then hosted on this blog. Great to get some ideas from across the pond!

Just Maths
http://justmaths.co.uk/blog/

Follow these 3 maths teachers on Twitter @Just_Maths for regular updates on the resources they create. They have some fantastic stuff on their website/blog free to download for others to use.

Would You Rather? blog
http://wyrmath.wordpress.com/

This is another recent find - a blog that has a lot of 'would you rather...?' questions that could be used as starter questions, extension problems, mini-plenaries etc. Well worth keeping in mind for the coming year.

Sheffield Maths
http://www.sheffieldmaths.co.uk/index.html

This site has loads of resources ready to download and use in class. I've used the 'Chris Moyles Quiz Night' loads in the past and are a favourite of my previous students.

Mathsbox
http://www.mathsbox.org.uk/index.html

The 'Settlers', in particular, are simply amazing. If you haven't seen on used them yet you're missing out.

Websites great for everyday resources & displays:

Teacher Resources on Line:
http://www.cleavebooks.co.uk/trol/index.htm

This site has number lines, graph paper, isometric paper, scales, grids, tables etc etc. I can't remember how many times I have thought to myself 'I need some 6 by 6 grids...' or 'where did I get my giant number line for the board...'. Everything is in one place here.

Teacher Created Resources
http://www.teachercreated.com/free/monthly-calendars.php

I like the monthly calendars on this site that you can download free as a pdf. They include information for each day that could spark conversations in tutor time.

A Maths Dictionary For Kids
http://www.amathsdictionaryforkids.com/dictionary.html
and
Maths Charts (for teachers)
http://www.amathsdictionaryforkids.com/mathsCharts.html

A great website for kids to use as part of homeworks, to aid in their understanding of the key mathematical terms and the charts are fantastic for displays. Print A3, some information can get lost (hard to see) if printed on A4.

Web Sudoku
http://www.websudoku.com/?level=1

A site to get all levels of sudoku puzzle for your students to do in class.

Ken Ken
http://www.kenken.com/teachers/classroom

An alternative to Sudoku, slightly more 'mathsy' than sudokus and just as popular with the kids.

IWB Tools

Online Stopwatch
http://www.online-stopwatch.com/full-screen-stopwatch/

I love this tool. I use it lots in class to time certain activities. I have also used it as a behavioural technique to count up the amount of time a class wastes talking when you're waiting at the front of the class.

Random Number Generator
http://www.e-beam.com/fileadmin/user_upload/misc_images/Flash_Tools/randomnumber.swf

Does exactly what it says on the tin. Choose your own range too.

Flash Maths
http://flashmaths.co.uk/viewFlash.php?id=1

My favourite resource on the site is the 'Memory Maths' 'game'. Students get a 4 by 4 grid and sums flash up randomly in the boxes throughout the time limit allowed. You have to work out the answers and fill in the grid before the time is up.

Sum Sense
http://resources.oswego.org/games/SumSense/summulti.html

This IWB resource flashes up times tables with a twist...the numbers are given, and the spaces for them but you have to drag and drop the digits in the correct order to make the sum correct.

Form Time

Form Time Ideas
http://formtimeideas.com/

This site was set up by Jonathan Hall @StudyMaths this year and it's brilliant. It includes links to the BBC News articles of the day, has maths sums, science periodic table symbols, literacy tasks, jokes, facts and plenty more. I used it loads as soon as I saw Jonathan's tweet and will continue to do so next year.

Wonderopolis
http://wonderopolis.org/

Great for those questions that make you think. A site from the US that is updated daily. You can scroll back through 'wonders' and search via categories too to find something suitable dependent on your tutor group theme that week? Follow them on Twitter to find out the daily 'wonders' @Wonderopolis

100 Word Challenge
http://100wc.net

My form group regularly took part in this last year and I love the idea, the site and the way students get enthused about writing to each of the weekly prompts. Follow them on Twitter @100word and @TheHeadsOffice


And that's it for now. I'm sure there's loads I have forgotten and this is by no means an exhaustive list of the resources/sites I have used over the past few years. I'll update if I realise any I've forgotten...

Viewing all 123 articles
Browse latest View live